Linux is a freely-available clone of the Unix operating system. The Unix operating system was developed in the late 1960's at AT&T Bell Laboratories. The C programming language was developed for doing system programming on Unix. Unix itself was eventually rewritten in C. Many free and commercial variants of Unix are available today, such as Solaris, HP-UX, AIX, FreeBSD, and Linux. Unix is primarily used on the server (e.g., web servers, email servers, etc.). Unix can be used on personal computers, but Microsoft Windows and Apple Macintosh are much more common on personal computers.
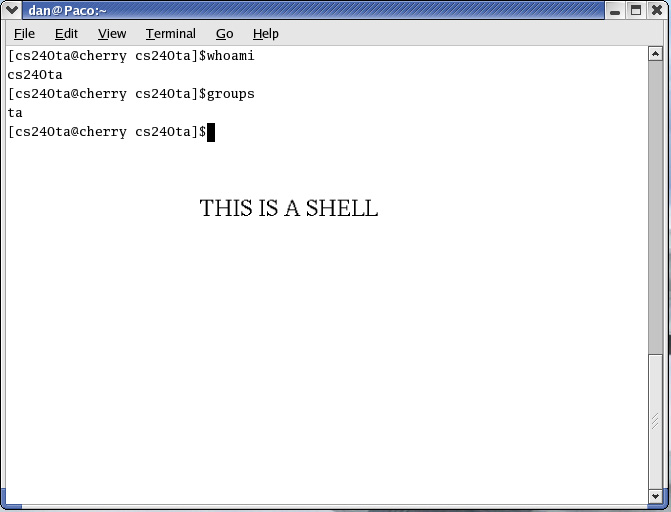
Access to Linux is based on users and groups. You must have a user account to login. Each user has a password and belongs to one or more groups. A group is just a set of users who are alike in some way. For example, the group named students might contain all users who are students, while the group named faculty might contain all users who are faculty members. Who you are and what groups you are in determines which files you can access and how you can access them. When you login, Linux remembers who you are, and makes access decisions based on your identity. The whoami command displays the current user. The groups command displays the user's groups.
Each user also has a home directory. Your home directory contains all of your personal files and directories.
The original and most powerful Linux user interface (UI) is the shell. The shell is a text-based command-line interpreter. There is also a GUI, but all of our work will be done using the shell, therefore our focus will be on the shell interface. bash is the default Linux shell, and will be used for all examples in this class. The same concepts also apply to other shells (sh, csh, tcsh, etc.).
After logging in, a shell can be opened by clicking on the shell icon in the toolbar at the bottom of the screen. You may open as many shells as you like.

If you don't see a shell icon at the bottom of the screen, you can open a shell as follows:
Paths in the Linux file structure are divided into directories, subdirectories, and file names. For example, /dir1/dir2/dir3/file. Keep in mind that Linux uses / but Windows uses \
The root directory is /
The shell has a current working directory (cwd), which is the directory that you're currently in. When you open a shell the cwd of the shell will be your home directory. When typing in commands, the cwd is represented by a single period. The parent directory of the cwd is represented by two periods, or ..
Your home directory is represented by a ~
To check what directory you're in, use the pwd (print working directory) command.
To change the cwd use the cd command. For example, the following command would change the cwd to the subdirectory named csclasses/cs240/chess within the user's home directory (represented by ~).
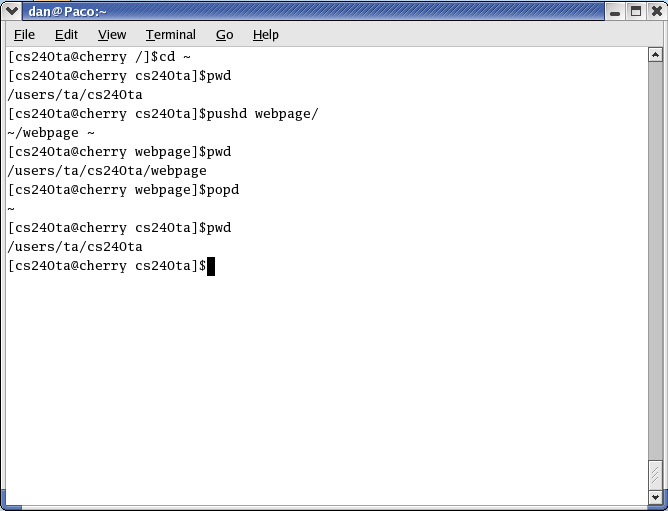
$ cd ~/csclasses/cs240/chesspushd and popd are also used for changing directories. pushd is like cd, but it also pushes the cwd onto a stack before changing directories. popd pops the top of the stack and returns you to the previous directory. For example:
$ pwd
/home/fred/csclasses/chess
$ pushd /home/fred/stuff
$ pwd
/home/fred/stuff
$ popd
$ pwd
/home/fred/csclasses/chess
$ mkdir backupUse the -p option to make all parent directories that don't currently exist.
$ mkdir -p backup/projects/cs240rmdir is used to remove an unused directory. The directory must be empty before it can be removed.
$ rmdir backup/projects/cs240If you want to remove a directory that is not empty, use the rm command described below.
$ cp source.file destination.file
$ cp project1.cpp backup/project1.cpp
If you're copying an entire directory, you can use the -r option to recursively copy all subdirectories. For example, the following command would recursively copy the cs240 directory to the backup directory:
$ cp -r cs240 backupAfter this command is executed, the backup directory would contain a subdirectory named cs240 that is a complete copy of the real cs240 directory.
The mv command is used to move and/or rename files and directories. It's syntax is the same as the copy command.
$ mv source.file destination.file
$ mv project1.cpp backup/project1.cpp
$ mv oldname newname
Be careful when using the mv and cp commands, because no prompt or warning is offered when overwriting existing files.
$ rm -r backupwill remove the directory backup with and all it's subdirectories.
By default, ls will not list the names of directory members whose names begin with a period. By using the -a option, ls will list the names of all files and subdirectories, including those that begin with a period.
By default, ls only lists the names of the files and subdirectories within the specified directory. If you want to see more information about the directory members in addition to their names, use the -l option (it's an ell, not a one).
$ cat text1.txtmore is also used for displaying the contents of a file, but it displays the file one screen-full at a time when it is too long to display all at once. If a file takes up more than a single screen, use more to be able to scroll and see all of the file.
$ more text1.txt
When a user tries to read from, write to, or execute a file, whether they are allowed to perform the desired action or not depends on who they are and what they are trying to do. Each file/directory has a set of "permissions" associated with it that indicate who is allowed to do what with that particular file/directory.
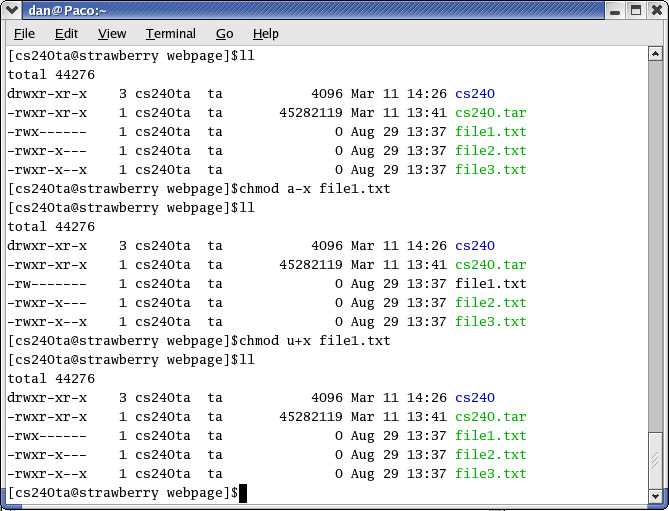
The permissions of a given file/directory are listed at the beginning of the line when the -l option is used with the ls command. There are 10 spaces. The first one indicates whether it is a file or a directory. The next three are the permissions granted to the owner of the file. The next three for the members of the group the file belongs to, and the last for all other users (i.e., users who are not the owner and are not in the file's group). The first space, if active, means the specified user(s) have read access, the next is write access, and the last is for executing the file. For example:
-rwxr-x--x 1 dan cs240ta 5386 Aug 15 11:09 script1.bashmeans that the owner (dan) has read,write, and execute permissions. Any member of the group cs240ta can read and execute the file, but can't write to it. All other users can execute the file, but can't read it or write to it.
$ chmod [new permissions] [file]The new permissions are specified using a letter representing the set of users you wish to change permissions for (u=owner,g=group,o=other,a=all), followed by + or - (giving or taking away the permission), followed by the permission to be granted/revoked (r,w,x). For example, the following command would turn on execute permission for all users.
$ ls -l comp.sxc
$ -rw-r--r--    1 dan      dan          5386 Aug 15 11:09 comp.sxc
$ chmod a+x comp.sxc
$ ls -l
$ -rwxr-xr-x    1 dan      dan          5386 Aug 15 11:09 comp.sxc
$ chown newowner file/dirTo change the group of a file/directory, use the chgrp command.
$ chgrp newgroup file/dirBoth chown and chgrp support the -r option for recursively changing the owner or group of an entire subdirectory.
$ chown -r newowner directory
$ chgrp -r newgroup directory
$ !557
You can also re-execute previous commands by specifying a prefix. For example, the following command would re-execute the most recent command that begins with the prefix "cd":
$ !cd
$ alias ll="ls -l"To see a list of already aliased commands, just type alias with no arguments. To remove an alias, you can use the unalias command.
$ unalias ll
$ ll
$ command ll not found
$ xemacs &
$ netscape &
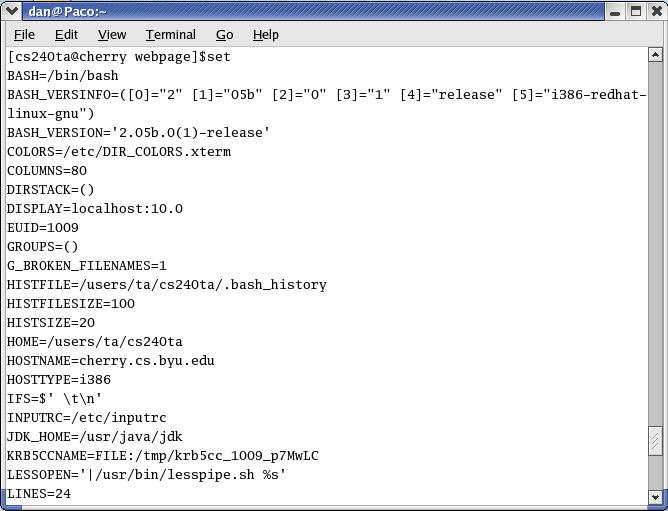
To reference a shell variable in a command, simply place the $ in front of the variable name. This will cause the shell to replace the variable reference with the current value of that shell variable. This can save a lot of typing. For example, to print out the current value for the PATH variable:
$ echo $PATH
$ /bin:/usr/bin:/home/fred/bin
The two variables you will be most concerned with are PATH and PS1.
$ netscapethe shell will look through all of the directories in the PATH looking for an executable file named "netscape" that it can run.
If you want the shell to always look in the cwd for executable files, you need to put the cwd on the PATH. If you don't have the cwd in your PATH variable, then in order to execute a file in the cwd you have to type ./filename. If the cwd is in the PATH variable you can just type the filename.
$ filename
$ command filename not found
$ ./filename
//program runs
To set the value of a shell variable, simply type the name of the variable, an equal sign, followed by its new value. So, to add the cwd to the PATH variable, use the following command:
$ PATH=$PATH:.This simply takes the current value of PATH, appends :. to it, and reassigns the new value to PATH. After executing this command, programs in the cwd can be executed by simply typing their names:
$ filename
// program runs
PS1 shell variable
PS1 is the variable controlling the prompt. You can change the prompt to be anything you want. For example, the following command would change the
prompt to be the string "DAN IS THE MAN $".
$ PS1="DAN IS THE MAN \$"The prompt format string stored in PS1 may contain special variables that are automatically replaced with useful information. Some of these are:
\w	 current working directory
\W	 last element of current working directory
\u	 user name
\h	 host name
\d	 current date
\t 	 current time
The most common format for PS1 is
PS1="[\u@\h \w]\$"
# list some files
$ ls –l a.txt b.txt c.txt

# copy some files
$ cp a.txt b.txt c.txt backup

# remove some files
$ rm a.txt b.txt c.txt
Typing long lists of file names can be tedious. To make this easier, the shell supports automatic, pattern-based file name expansion. File name expansion allows command arguments to be patterns which represent multiple file/directory names in a very compact fashion. For example, the following command would list information about all files/directories whose names start with a lower-case z:
$ ls -l z*Rather than having to explicity type the names of all files/directories starting with z, we simply typed the pattern z*. The shell knows that this pattern represents all file/directory names starting with z. Similarly, the following command would list information about all files/directories whose names begin with a lower-case letter:
$ ls -l [a-z]*Before executing a command, the shell first processes each command argument that contains file name expansion operators. It automatically replaces a pattern with the names of all files and directories that match the pattern. If nothing matches the pattern, the argument is not modified at all. File name expansion works for all commands, not just Linux commands.
There are many file name expansion operators, some of which are listed below:
| Operator | Meaning | Example |
|---|---|---|
| match any string of zero or more characters | $ cp *.txt backup | |
| match any single character | $ cp ?.txt backup | |
| match any of the enclosed characters | $ cp [abc].txt backup | |
| match anything but the enclosed characters | $ cp [!abc].txt backup | |
| match any character in the range | $ cp [a-c].txt backup | |
| match any character not in the range | $ cp [!a-c].txt backup | |
| match any of the enclosed strings | $ cp {dog,cat,duck}.txt backup | |
| substitute user’s home directory | $ cp ~/cs240/*.txt backup | |
| substitute some other user’s home directory | $ cp ~george/cs240/*.txt backup |
# print the message "* is an asterisk"
$ echo * is an asterisk
Normally, the shell will perform file name expansion on all arguments that look like patterns, even if we don't want it to. In the example above, before calling echo the shell would replace the asterisk with the names of all files/directories in the current directory, which is not the intended effect.
The solution to this problem is quoting. Quoting is a mechanism for turning off file name expansion, causing the shell to pass arguments through unmodified, even if they contain file name expansion operators. File name expansion can be turned off for a single character by preceding it with \, like this:
# print the message "* is an asterisk"
$ echo \* is an asterisk
Any character that is preceded by \ is taken literally and passed through untouched (i.e., unexpanded).
You can also quote entire strings by enclosing them in single-quotes, like this:
# print the message "* is an asterisk"
$ echo '* is an asterisk'
All characters between the single-quotes are taken literally.
You can use double-quotes instead of single-quotes, but the meaning is slightly different. The meaning of single-quotes is: "Shell, don't change the string between single- quotes, not matter what!". The meaning of double-quotes is: "Shell, don't change the string between double-quotes, unless it contains a shell variable reference. In that case, it's OK to replace the variable with its value.". The following example demonstrates the difference between using single and double quotes.
$ echo ’Is your name $USERNAME ?’
Is your name $USERNAME ?

$ echo “Is your name $USERNAME ?”
Is your name fred ?
In addition to turning off file name expansion, quoting is also useful for handling file/directory names that contain spaces. For example, suppose that you have a directory named "my cs240 files". Using the cd command to change to this directory would look like this:
$ cd my cs240 filesThe problem with this is that "my cs240 files" looks like three arguments instead of one, and the cd command will not work. The solution to this problem is to quote the directory name:
$ cd 'my cs240 files'
$ wc homework.txt
4	7	280 homework.txt
The output above means that the file homework.txt contains 4 lines, 7 words, and 280 bytes.
By default, wc prints out all three pieces of information The –l, -w, and –c options can be used to tell wc to display only one or two of these pieces of information
$ wc –l homework.txt
4 homework.txt
wc can also compute totals for multiple files
$ wc –l *.txt
# where is the main function?
$ grep main *.cpp
By default, grep performs case-sensitive searches (i.e., case matters). The –i option can be used to perform a case-insensitive search:
# where is the main function?
$ grep –i mAiN *.cpp
So far we have used only literal strings as our search patterns. The search pattern can also be a regular expression. For example, the following command searches a file for lines containing the text BYU, with any number of spaces between the letters:
$ grep ’B *Y *U’ file.txt
Grep supports a variety of pattern operators, some of which are listed below:
| Operator | Meaning |
|---|---|
| . | match any character |
| * | match zero or more of the preceding (Note that the meaning of * here is different than with file name expansion) |
| ^ | match beginning of line |
| $ | match end of line |
| \ | escape the following character |
| [abc] | match one in the list |
| [a-z] | match one in the range |
| [^abc] | match one not in the list |
| [^a-z] | match one not in the range |
| \{n,m\} | match between n and m of the preceding |
| \{n\} | match exactly n of the preceding |
| \{n,\} | match n or more of the preceding |
Some of the grep pattern operators are also shell file expansion operators.
For this reason, when using grep it is frequently necessary to quote the pattern
argument so that the shell does not perform file name expansion on it.
The tar command-line has the following form:
Many Linux programs accept file names as command-line arguments (e.g., ls, cp, mv, rm, wc, etc.).
If you don't provide any file names on the command-line, these programs will
read their input from standard input (i.e., the keyboard).
This allows the user to interactively type the input to the program rather than
having it read from a file.
For example, the following command will count the number of lines typed in by
the user (CTRL-D is used to terminate interactive input).
For example, suppose that you have a text file and you want to count the number of lines
in the file that contain the text "BYU".
The grep command can be used to find the lines that contain "BYU", but it doesn't know
how to count them.
Similarly, the wc command can be used to count lines, but it doesn't know how to find only
the lines that contain "BYU".
By running grep and wc together in a pipeline, we can achieve the desired effect.
As shown above, multiple commands may be assembled into a pipeline by placing | between
the commands.
This tells the shell to run the programs so that the standard output of one program
becomes the standard input of the next program, thus connecting the programs
together.
The first command in the pipeline will read its input from the keyboard or a file.
The last command in the pipeline will write its output to the screen or a file.
All commands in the middle of the pipeline will read their input from the previous
command, and write their output to the next command.
Of course, command pipelines may contain more than two commands.
For example, instead of counting "BYU" lines, we might want to sort them and send them
to a printer.
Pipelines work because programs like grep, wc, sort, and print read their input
from standard input if no file name is specified on the command line.
find
The find command is used to recursively search a directory structure for files/directories
that match specified criteria.
Possible search criteria include name, modification date, file type, and many other
possibilities.
Once a matching file/directory has been found, it can be operated upon by
copying it, deleting it, running wc or grep on it, etc.
Typical uses of find include the following:
Find is a complex command with many options.
Here we cover only a few of the most useful options.
The find command-line has the following form:
$ find pathnames conditions operations
Search Criteria
The following examples show how to provide search criteria for several common types
of searches.
Search by Name
$ find pathnames -name pattern operations
# print the paths of all files/dirs named core in the CWD
$ find . -name core -print

# print the paths of all .cpp files in cs240 directory
$ find ~/cs240 -name '*.cpp' -print
Search by Type
$ find pathnames -type c operations
# print the paths of all regular files in the CWD
$ find . -type f -print

# print the paths of all directories in cs240 directory
$ find ~/cs240 -type d -print
Search by Modification Time
$ find pathnames -mtime (+n|-n|n) operations
# print the paths of all files/dirs in the CWD that
# were last modified more than 7 days ago
$ find . -mtime +7 -print

# print the paths of all files/dirs in the cs240
# directory that were last modified less than 7 days ago
$ find ~/cs240 -mtime -7 -print
Operations on Matching Files
The next examples show how to perform common operations on matching
files/directories.
Print the full path of each matching file/directory
$ find pathnames conditions -print
# print the paths of all .cpp files in cs240 directory
$ find ~/cs240 -name '*.cpp' -print
Execute a command on each matching file/directory
$ find pathnames conditions -exec command {} \;
# search all .cpp files in the CWD for "main"
$ find . -name '*.cpp' -print -exec grep main {} \;

# delete all .o files in the cs240 directory
$ find ~/cs240 -name '*.o' -print -exec rm {} \;
In this case, {} is replaced by the name of the matching file/directory,
and \; is used to mark the end of the command.
tar
Sometimes it is necessary to store a set of files and directories in a single file
called an "archive".
This is useful for backing up files and for transmitting them over a network
(email, web, ftp, etc.).
In Linux, the tar command is used to create archive files, and to extract files/directories
from archive files.
Archive files created by tar are called "tar files", and frequently have a name with the
.tar extension.
Tar can be used to perform one of three primary tasks:
$ tar options tar-file other-files
### create a tar file containing the source files for myprog

$ ls
myprog.cpp myprog.h myprog.html
$ tar cf myprog.tar *
$ ls
myprog.cpp myprog.h myprog.html myprog.tar


### list the contents of myprog.tar

$ tar tf myprog.tar
myprog.cpp
myprog.h
myprog.html


### extract the myprog source files

$ rm *.cpp *.h *.html
$ ls
myprog.tar
$ tar xf myprog.tar
$ ls
myprog.cpp myprog.h myprog.html myprog.tar


### create a compressed a tar file containing the entire myprog directory

$ cd ..
$ ls
myprog
$ tar czf myprog.tgz myprog
$ ls
myprog myprog.tgz


### list the contents of myprog.tgz

$ tar tzf myprog.tgz
myprog/myprog.cpp
myprog/myprog.h
myprog/myprog.html


### extract the myprog directory

$ rm -R myprog
$ ls
myprog.tgz
$ tar xzf myprog.tgz
$ ls
myprog myprog.tgz
STANDARD INPUT/OUTPUT
C++ programs can read input from the keyboard.
This is called “standard input”.
C++ programs can also write output to the screen (i.e., the shell).
This is called “standard output”.
### count the number of lines typed, hit CTRL-D to end

$ wc -l
Because no file name was provided on the command-line, wc will take its input
from the keyboard.
Once CTRL-D is hit, wc knows that the user is done typing.
STANDARD I/O REDIRECTION
The shell lets you redirect a program’s standard input so that it comes from a
file instead of from the keyboard.
The command below instructs the shell to run the program "myprog" with its standard input coming from
a file named "file.input".
This means that whenever "myprog" reads input from the keyboard, it will actually be
reading from "file.input".
$ myprog < file.input
The shell also lets you redirect a program’s standard output so that it goes to a file
instead of the screen.
The command below instructs the shell to run the program "myprog" with its standard output
going to a file named "file.output".
This means that whenever "myprog" writes output to the screen, the output will actually go
to "file.output" instead of the screen.
# overwrite the output file
$ myprog > file.output

# append to the output file
$ myprog >> file.output
You can also redirect both standard input and standard output at the same time, as shown
below.
$ myprog < file.input > file.output
PIPELINES
The shell allows you to run multiple commands simultaneously, with the output
of one command becoming the input to the next command.
This allows commands to be assembled into a "pipeline" where each program reads input,
transforms the data, and then sends the transformed data to the next
command in the pipeline for further processing.
$ grep ’BYU’ file.txt | wc –l
First, run grep on the file, searching for the pattern "BYU".
Take the output of grep and connect it to the input of wc.
This will cause grep to find only those lines containing "BYU" and send them to wc.
When wc receives the "BYU" lines from grep, it will count them and print out the answer.
$ grep 'BYU' file.txt | sort | print
USERS & GROUPS
SHELL
FILE PATHS AND CWD
CD, PUSHD, POPD
MKDIR, RMDIR
CP, MV
RM
LS
CAT AND MORE
FILE PERMSSIONS
CHMOD
CHOWN, CHGRP
HISTORY AND !
ALIAS,UNALIAS
RUNNING COMMANDS IN BACKGROUND
SHELL VARIABLES AND SET
THE PATH SHELL VARIABLE
THE PS1 SHELL VARIABLE
FILE NAME EXPANSION
QUOTING
WC
GREP
FIND
TAR
STANDARD INPUT & OUTPUT
STANDARD I/O REDIRECTION
PIPELINES